 Folding Adirondack Chair & Footstool Downloadable Plan
SKU: BHP-28
Price: CAD $10.98
Folding Adirondack Chair & Footstool Downloadable Woodworking PatternMuskoka Folding Chair & Footstool
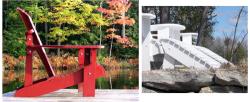
NOTE: The instructions will print to letter size paper. The link to download your woodworking plans will be in your emailed receipt after making your purchase.Unlike a regular Adirondack chair, where there are many different styles, most folding chairs seems to be fairly similar in the way they fold. In designing this chair, I felt it was important to keep the integrity of the original chair design, with the tapered back support. Since I, and many fellow Canadian cottagers, prefer to paint our chairs in bright colours, it was also important that there was sufficient space between the folding parts, yet keeping the structural strength. The plans include the alternate use of carriage bolts encased in polyethylene tubing and custom made 1/4" washers, using UHMW plastic, used for table saw and router jigs for smooth movement. All parts are readily available at Home Depot, Rockler Hardware and Lee Valley Tools, as well as many other leading woodworking supply stores. The image above, showing the chair in the upright position, is identical to the original in position and comfort. The image in the middle shows the chair reclined to 50 degrees....a very comfortable snoozing position. The back is supported by the arms and curved back seat slat, and all pieces are screwed and glued with Gorrilla Glue for the necessary strength. A recent Customer picked up some plans at my home and sat in one of the final prototypes. He found it very comfortable in the reclined position, and strong enough to hold his over 6' height and 210 lb. weight. The right hand image shows the chair folded to 12 1/2" (3.81cm) and can hang on the wall of my garage.To fold the chair, push on the back and walk it forward into the folded position. To open the chair, pull up on the back. The chair will open to the reclined position, then pull on the back support to put it in the regular 65 degree angle. To recline the chair, while sitting in it, reach back and pull the back support forward. Lean back and relax! If you are using your chairs on uneven ground or on the beach, you may want to add stop locks to the back supports. This will eliminate the back from reclining into the sand. To fold the chair, push the back support forward to unlock it, and fold forward. The plans include part sizes, assembly instructions with matching step-by-step photos, parts pictures and full size paper cut-outs, which you can trace onto hardboard for permanent templates. Each is lettered in order of assembly, and the pivoting parts are marked and measured for bolt locations. Instructions also include expanded images of the step-by-step procedure.
|